Origami, the ancient Japanese art of paper folding, has captivated people worldwide with its elegance and precision. The rose is a timeless symbol of beauty and love among the various origami designs. With its delicate petals and graceful form, origami can be a delightful handmade gift or a stunning decorative piece.
This tutorial will guide you through creating an easy origami rose. Whether you’re a beginner or have some experience in origami, this step-by-step guide will help you fold a charming rose with just a few simple folds. All you need is a square sheet of origami paper and a dash of creativity.

Not only is origami a wonderful way to engage your artistic side, but it also offers a meditative and relaxing experience. As you fold each crease and shape the paper, you’ll immerse yourself in tranquility while simultaneously creating a beautiful work of art.
So, let’s gather our materials and embark on this creative journey to make a beautiful origami rose that will surely impress and bring joy to those who behold it.
If you want to learn more about origami, click here.
Materials Needed for Easy Origami Rose
| Material | Purpose | Alternatives |
| Origami paper | The main material for folding the rose. It is lightweight, square-shaped, and comes in various colors and patterns. | Colored construction paper, patterned scrapbooking paper, or square-cut wrapping paper. |
| Scissors (optional) | Used for cutting the paper into a square shape or making precise adjustments. | Craft knife or tearing the paper along a straight edge to achieve a square shape. |
| Glue (optional) | Provides additional stability and secures different parts of the rose together. | Double-sided tape or origami glue dots for a cleaner finish. |
While these are the commonly used materials, feel free to experiment with different types of paper and embellishments to create unique variations of the origami rose. Just ensure that the paper you choose is easy to fold and holds its shape well.
Step-by-Step Guide to Make an Easy Origami Rose
You can successfully create an easy origami rose by following these steps. You only need to adjust the shape and position of the petals as desired to achieve your preferred look. Later you can display your beautiful origami rose or share it as a heartfelt gift for someone special.
Prepare your materials For Easy Rose Origami
Gathering all the necessary materials before folding your easy origami rose is essential. Here’s a breakdown of each item and its purpose:
Origami paper
- Origami paper is specifically designed for folding and comes in various colors, patterns, and sizes.
- It is lightweight and has a square shape, which makes it ideal for creating origami models.
- You can find origami paper at craft stores and online retailers or make your own by cutting regular paper squarely.
Scissors (optional)
- While not always necessary, scissors can be useful for cutting the paper into a square shape or making precise adjustments.
- If your origami paper is not square, you can trim the edges using scissors to create an even square.
Glue (optional)
- Glue can be used to provide additional stability to the finished origami rose.
- If you want your rose to hold its shape more securely, you can apply a small amount of glue to specific parts during the folding process.
- Alternatively, you can use double-sided tape or origami glue dots for a cleaner finish without liquid glue.
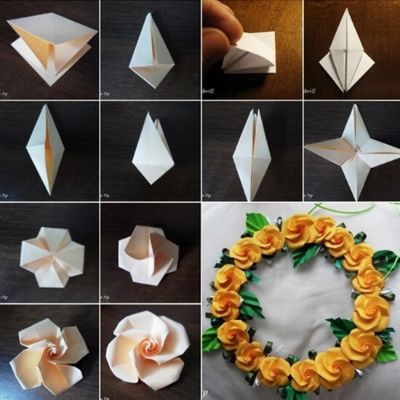
Folding the Base Of Rose Origami


Now that you have your materials ready. Let’s begin folding the base of the origami rose. This step will create the foundation upon which we’ll shape the petals later.
- Start with the square sheet of origami paper.
- Fold the paper in half diagonally to form a triangle. Make sure the edges align precisely, and crease the fold well.
- Unfold the triangle to reveal the square again.
- Next, fold the paper in half diagonally, forming another triangle. Again, ensure the edges align perfectly and crease the fold firmly.
- Unfold the triangle once more, returning to the square shape. You should now have two intersecting crease lines on your paper, creating an “X” shape.
By completing these steps, you have successfully folded the base of your origami rose. These initial folds will provide important reference points for the subsequent shaping of the petals. Create distinct and well-defined creases to guide your folding in the following steps.
Shaping the Outer Petals Of Origami Rose

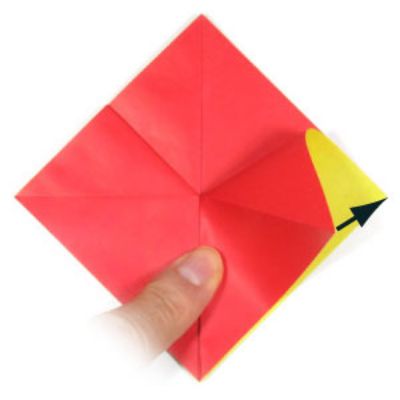

In this step, we will shape the outer petals of the origami rose. By folding specific parts of the paper, we will create the initial layers that give the rose its distinctive appearance.
- Take the right corner of the triangle and fold it towards the center along one of the crease lines formed in the previous step. Ensure that the fold aligns with the center accurately.
- Repeat the same folding process for the left corner of the triangle, folding it towards the center along the opposite crease line. The two folded flaps should meet at the center.
- Flip the paper over to the other side.
- Once again, fold the right corner towards the center along the corresponding crease line on this side.
- Repeat the process for the left corner, folding it towards the center along its respective crease line. The result will be two additional folded flaps meeting at the center.
Creating the Inner Petals Of Origami Rose

In this step, we will create the inner petals of the origami rose, giving it a more intricate and layered appearance.
- Take the upper layer of the right flap and fold it towards the center along the existing crease line. This fold should align with the center accurately.
- Repeat the same folding process for the upper layer of the left flap, folding it towards the center along its respective crease line. Both folded flaps should meet at the center.
- Flip the paper over to the other side.
- Once again, fold the upper layer of the right flap towards the center along its corresponding crease line.
- Repeat the process for the upper layer of the left flap, folding it towards the center along its crease line. The result will be two additional folded flaps meeting at the center.
Creating the Inner Petals
In this step, we will focus on creating the intricate inner petals of the origami rose. These folds will add depth and texture to the rose’s appearance.
- Identify the right flap of your folded paper. Take the upper layer of this flap and fold it towards the center along the existing crease line. Ensure that the fold aligns precisely with the center of the rose.
- Repeat the same folding process for the left flap. Take the upper layer of the left flap and fold it towards the center along its crease line. Both folded flaps should meet at the center, forming a triangular shape.
- Flip the paper over to the other side so the folded flaps are now facing down.
- Once again, fold the upper layer of the right flap towards the center along its corresponding crease line. This creates an additional layer of petals.
- Repeat the process for the left flap. Fold the upper layer towards the center along its respective crease line. Now you also have two folded flaps on this side, meeting at the center.
These folds create the inner petals of your origami rose, giving it a more detailed and realistic look. Fold the flaps neatly and align them accurately to achieve a visually appealing outcome. As you progress, you will notice the rose taking shape with the formation of multiple layers of petals.
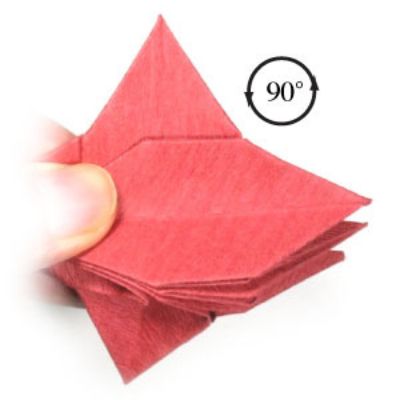
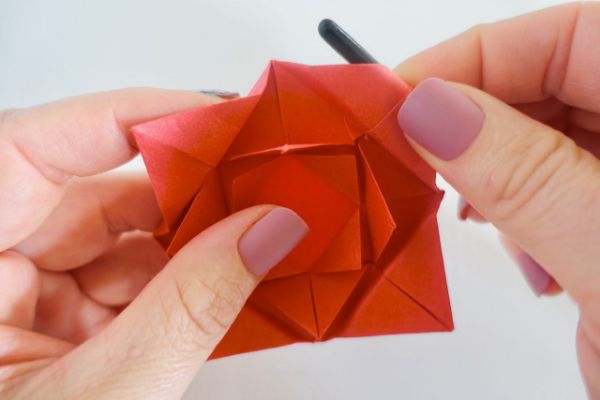
Forming the Rosebud Of Origami
In this step, we will shape the rosebud, the central part of the origami rose. We will give the rose a recognizable and realistic form by folding and tucking the paper.
- Locate the bottom tip of the triangle, which is the open end of the paper.
- Fold the bottom tip upwards, towards the top of the triangle. This creates a small flap at the bottom of the rosebud.
- Carefully tuck the flap into the pocket formed by the inner petals. This helps secure the shape of the rosebud and holds it in place.
- Gently shape the rosebud by curving the outer and inner petals with your fingers. This gives the rose a more natural and lifelike appearance.
- Adjust and refine the petals as desired, ensuring they are evenly spaced and form a pleasing shape.
Optional Steps for Finishing Touches (Optional)
In this final step, we will explore some optional finishing touches that can enhance the overall presentation of your origami rose. These steps allow for adding elements such as a stem, leaves, or other decorative details.
Stem
Cut a small strip of green paper to create a stem for your rose. The length and width of the strip depend on your preference. Roll the strip tightly to form the stem shape.
- Apply a small amount of glue to the end of the paper strip to secure it in place.
- Attach the stem to the bottom of the rose. You can use glue or tape to secure the stem to the rose’s base, ensuring it is centered and aligned.
Leaves
If you’d like to include leaves in your origami rose design, follow these steps:
- Cut a small square or rectangular piece of green paper for each leaf.
- Fold each piece of paper in half diagonally to create a triangle.
- Fold the triangle in half again, perpendicular to the first fold.
- Unfold the paper slightly and gently shape it into a leaf-like form by curving the sides.
- Attach the leaves to the stem of the rose, just below the rosebud, using glue or tape.
Additional Details
You can further personalize your origami rose by adding decorative elements such as thorns or other embellishments.
- To create thorns, cut small triangular shapes from green paper and attach them along the stem of the rose using glue.
- Feel free to experiment with other creative additions like ribbons, beads, or glitter to make your origami rose unique.
Making Rose Boquete with Origami

Traditional Method

There is a traditional method for creating a bouquet of origami roses. One popular technique is to make multiple individual origami roses and assemble them into a bouquet. Here’s a simplified step-by-step guide to making origami roses for a bouquet:
- Start by folding a single origami rose following the steps in this guide.
- Repeat creating multiple origami roses using different colored or patterned paper.
- Once you have a collection of origami roses, you can arrange them into a bouquet.
- To assemble the bouquet, gather the stems of the origami roses and secure them together using a rubber band or floral tape.
- Cover the stems with green floral tape or wrap them with ribbon for a more polished look.
- To add a finishing touch, you can attach a decorative bow or ribbon at the base of the bouquet.
This method allows you to create a stunning bouquet of origami roses by arranging multiple individual roses together. The bouquet can be customized with different colors, sizes, and variations of origami roses to suit your preferences and the occasion.
Quick And Minimal Folding Steps

If you’re looking for a quick and relatively simple method to make an origami rose bouquet, you can try the following technique:
- Start with a square piece of origami paper for each rose you want to create.
- Fold the paper diagonally in half to form a triangle.
- Fold the triangle in half again, bringing the outer corners together.
- Hold the folded paper at the closed end and gently twist it in a spiral motion.
- As you twist the paper, it will naturally form a rosebud shape.
- Secure the twisted end of the paper with a small piece of tape or a dab of glue to hold the rosebud in place.
- Repeat the process with additional pieces of origami paper to create more rosebuds.
- Once you have several rosebuds, gather them and secure the stems with a rubber band or ribbon.
- Optionally, you can wrap the stems with floral tape or ribbon for a finished look.
This method lets you quickly create a bouquet of origami roses with minimal folding steps. While the resulting roses may have a simpler appearance compared to more intricate folding techniques, they still capture the essence of a rose and can be arranged beautifully in a bouquet.
Feel free to experiment with different origami paper sizes and colors to add variety to your bouquet. With this time-saving approach, you can enjoy creating an origami rose bouquet in a shorter amount of time while still achieving a charming result.
Conclusion
Creating easy origami can be a delightful and rewarding experience. You can transform a square paper sheet into a beautiful rose representation with a few simple folds. Whether you make a single rose or a bouquet, origami roses make charming gifts and decorations for various occasions. The step-by-step guide provided here gives you a foundation to start your origami journey, and you can further explore variations and techniques to personalize your creations. So, grab some origami paper, let your creativity bloom, and enjoy the art of folding origami roses!