Welcome to the world of wind chimes, where artistry and nature’s melody intertwine to create harmonious symphonies. Crafting your wind chime is a delightful and fulfilling DIY project that adds charm and tranquility to any space. The gentle tinkling of chimes dancing in the breeze can transform your home, garden, or balcony into a soothing oasis.

Beyond their aesthetic allure, wind chimes have long been valued for their therapeutic benefits. From reducing stress and anxiety to uplifting moods, the ethereal sounds produced by these tinkling wonders hold the power to elevate our spirits and reconnect us with nature.
This blog post will take you on a journey to crafting your wind chime. Whether you’re a seasoned crafter or a curious beginner, we’ve got you covered. You’ll discover the joy of selecting the perfect materials, designing a unique chime that reflects your personality, and fine-tuning the sound to create a symphony that resonates with your soul.

So, roll up your sleeves, and let’s embark on this captivating DIY wind chime project together. Get ready to breathe life into your creative vision and bask in the enchanting melodies of your handcrafted wind chime!
Read more about How To Make Maracas?
How To Make Diy Wind Chimes Copper Pipe?- Step-By-Step Guide
Creating DIY wind chimes from copper pipes can be a wonderful way to add a touch of elegance and beauty to your outdoor space. Copper pipes produce a distinct and pleasing sound, making them an excellent choice for this project. Here’s a step-by-step guide on how to make DIY wind chimes using copper pipes:
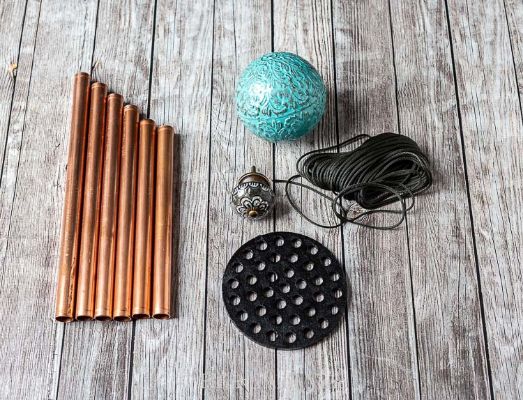
Materials Needed:
- Copper pipes of varying lengths (1/2 inch diameter is recommended)
- Pipe cutter or hacksaw
- Sandpaper or file
- Drill
- Fishing line or nylon string
- Wooden or metal ring (for the top)
- Wooden or metal beads
- S-hook or swivel hook
- Clear sealant (optional for weather protection)
Method
Step 1: Measure and Cut the Copper Pipes
Measure and mark the desired lengths for your copper pipes using a measuring tape. Consider creating pipes of different lengths to produce various tones.
Use a pipe cutter or hacksaw to cut the pipes carefully at the marked points. Make sure to wear appropriate safety gear when cutting the pipes.
Step 2: Smooth the Edges
After cutting the pipes, use sandpaper or a file to smooth the rough edges of each pipe. This will give them a clean finish and prevent injuries when handling the wind chimes.
Step 3: Drill Holes
Next, use a drill to create a small hole near the top of each copper pipe. Ensure the holes are big enough to thread the fishing line or nylon string through.
Step 4: Assemble the Chimes
Take the wooden or metal ring and thread the copper pipes through the holes you drilled. Arrange the pipes in descending order of length to produce a pleasing musical scale. Add wooden or metal beads between each pipe to create spacing and enhance the sound.
Step 5: Secure the Top
Attach the top of the wind chime by tying the fishing line or nylon string to the wooden or metal ring. Make sure the strings are evenly spaced to keep the chimes balanced.
Step 6: Add the Hanging Element
Attach an S-hook or swivel hook to the chime’s top for easy hanging. You can add decorative elements, such as additional beads or ornaments, to the hanging element for extra visual appeal.
Step 7: Fine-Tune and Test
Before finalizing the wind chime, hang it in a place with a gentle breeze and listen to the sounds it produces. Fine-tune the pipes’ lengths or the beads’ positioning to achieve the desired musical effect.
Step 8: Weatherproofing (Optional)
If you plan to keep the wind chime outdoors, consider applying a clear sealant to the copper pipes to protect them from weathering and oxidation over time. This step will help maintain the chime’s appearance and sound quality for longer.
| Now that your DIY copper pipe wind chime is complete, hang it in your garden, patio, or balcony, and let the soothing melodies of nature fill your space. Enjoy the serene ambiance and the sense of accomplishment of creating your harmonious masterpiece. |
How To Make Wind Chimes From Recycled Materials At Home? – Step-By-Step Guide

Creating wind chimes from recycled materials is an eco-friendly project and a creative way to give new life to old items. The beauty of these wind chimes lies in their uniqueness and their positive impact on the environment. Here’s a step-by-step guide on how to make wind chimes from recycled materials:

Materials Needed
- Various recycled materials (e.g., tin cans, bottle caps, seashells, old utensils, keys, CDs, etc.)
- Wooden or metal ring (for the top)
- Beads or small trinkets (optional for additional decoration)
- Fishing line or nylon string
- Drill
- Small eye hooks or screws
- Sandpaper or file (if needed)

Method
Step 1: Collect and Prepare Recycled Materials
Gather various recycled materials that will serve as the chimes for your wind chime. Clean and dry the items thoroughly to remove any dirt or debris.
Step 2: Create Holes
Using a drill, carefully create a small hole near the top of each recycled item. The hole size should be large enough to thread the fishing line or nylon string through. If some items have sharp edges, use sandpaper or a file to smooth them out for safety.
Step 3: Organize the Chimes
Lay out the recycled materials and arrange them in a way that pleases your aesthetic sense. Experiment with different combinations and consider grouping items of similar materials for a cohesive look.
Step 4: Attach Chimes to the Top Ring
Thread the fishing line or nylon string through the holes in each recycled item, tying a secure knot to keep them in place. Connect the other end of the string to the wooden or metal ring, ensuring that the chimes hang at different lengths to create varied sounds.
Step 5: Add Beads or Trinkets (Optional)
Add beads or small trinkets between the recycled items for an extra decorative touch. These can enhance the visual appeal of your wind chime while also producing additional sound effects.
Step 6: Create the Hanging Element
Attach a fishing line or nylon string length to the top ring, forming a loop for hanging the wind chime. Add a small wooden or metal bead at the bottom of the hanging element to prevent it from slipping through the ring.
Step 7: Find the Perfect Spot
Once your wind chime is complete, find the perfect spot to hang it. Consider placing it in an area with a gentle breeze, such as a garden, patio, or near a window.
Step 8: Enjoy Your Recycled Wind Chime
Now that your wind chime is hanging, take a moment to appreciate the delightful sounds it creates as it sways in the wind. Embrace the satisfaction of crafting something beautiful and eco-friendly from recycled materials, adding a touch of charm and environmental consciousness to your space.


Wind-Up With Melodious Chimes
Crafting wind chimes from recycled materials is a rewarding and eco-conscious endeavor. By transforming discarded items into delightful works of art, you add a unique touch to your surroundings and contribute to a greener planet. As gentle melodies dance in the breeze, you’ll be reminded of the beauty of repurposing and our harmonious connection with nature.
Embrace the joy of creativity, and let your recycled wind chime symbolize sustainability and artistic ingenuity for all to admire.